
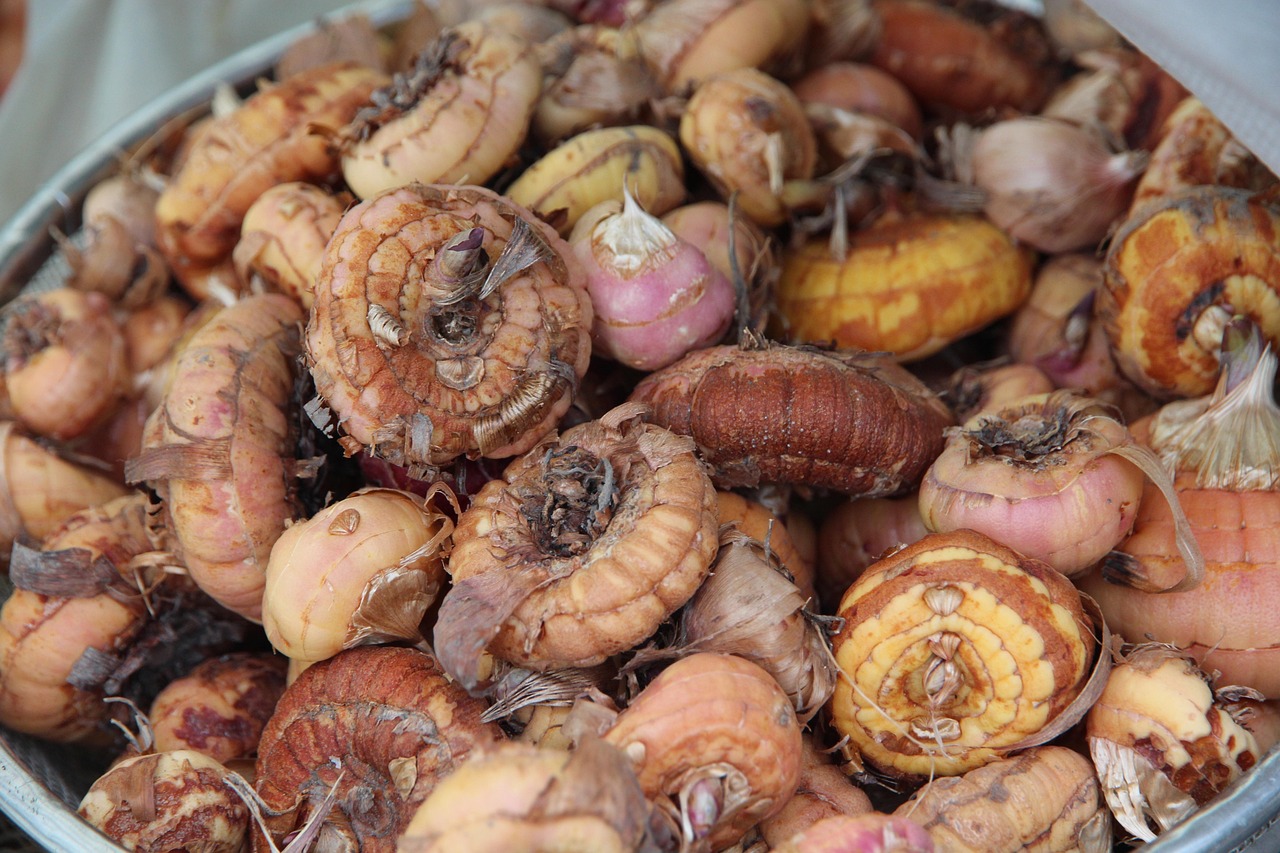
Gladiolus are beloved for their towering spikes of colorful, trumpet-shaped flowers. Learning the correct timing and planting depth is the secret to ensuring these corms thrive in your garden throughout the summer months. To achieve the best results, you must plant them in spring once the soil has warmed and all danger of frost passes.
While these perennials are relatively easy to grow, they require specific conditions to produce their signature dramatic blooms. They thrive in full sun and well-draining soil, making them a perfect choice for adding vertical interest to flower beds. Understanding their growth cycle helps you avoid common pitfalls like rot or poor stem development.
In this guide, we break down the essential steps for successful cultivation, from selecting high-quality corms to proper spacing techniques. We will walk you through the ideal planting depth and provide expert tips on maintenance throughout the growing season. Follow these practical instructions to enjoy a vibrant, long-lasting display of beautiful gladiolus flowers.

The Best Time to Plant Gladiolus
Gladiolus are tender perennials that cannot survive freezing temperatures. Because their corms are highly susceptible to rot in cold, wet soil, timing your planting correctly is the most important step in ensuring a successful bloom cycle.
The ideal time to plant gladiolus is in the spring, once the soil has thoroughly warmed and all danger of frost has passed. Planting too early into cold, damp earth often leads to stunted growth or corm decay.
To determine the perfect window for your specific garden, use these practical guidelines:
- Check your local frost dates: Aim to plant your corms two to four weeks before your area’s last expected spring frost. This timing allows the soil to warm sufficiently while providing the plants with a long, productive growing season.
- Monitor soil temperature: If you prefer a scientific approach, wait until the soil temperature reaches at least 55 degrees Fahrenheit at a depth of four inches. You can easily measure this using an inexpensive soil thermometer from a local garden center.
- Follow the calendar: In many temperate regions, this typically falls between mid-April and late May. If you live in a climate with a very short growing season, you can start corms indoors in pots about a month before your last frost date to give them a head start.
For a continuous display of vibrant color throughout the summer, practice “succession planting.” Instead of putting all your corms in the ground at once, plant a new batch every two weeks until early July. This staggered approach ensures that you will have fresh, blooming spikes appearing in your garden from mid-summer well into the autumn months.
Always choose a location that receives full sun and has excellent drainage. If your soil is heavy clay, mix in organic compost before planting to improve aeration and prevent water from pooling around the corms. By waiting for the soil to warm, you provide the perfect environment for your gladiolus to establish strong roots and produce healthy, tall stalks.
Choosing the Right Location and Soil
To ensure your gladiolus produce tall, sturdy spikes and vibrant blooms, selecting the right location is your most important step. These flowers are sun-worshippers that require a minimum of six to eight hours of direct, unfiltered sunlight every single day. If planted in a shaded area, the stems will likely become weak, lean toward the light, and fail to produce a full display of flowers.
Beyond light, soil quality is the foundation of a healthy garden. Gladiolus corms are highly susceptible to rot if they sit in water-logged ground. Before you plant, observe your garden after a heavy rain. If you notice standing water or puddles that linger for hours, you must improve the drainage before putting your corms in the ground.
If your garden features heavy clay soil, do not be discouraged. You can easily amend the site to create a hospitable environment. Follow these steps to prepare your soil:
- Clear the area: Remove all weeds and debris from the planting site to reduce competition for nutrients.
- Add organic matter: Mix in two to three inches of compost, aged manure, or leaf mold into the top eight inches of soil. This improves the texture of clay, allowing excess water to move through the ground more efficiently.
- Check for aeration: Your soil should feel loose and crumbly, not compacted. If it remains dense, continue incorporating organic material until it reaches a loamy consistency.
For those gardening in areas with poor drainage, consider planting in raised beds or containers. This allows you to control the soil composition entirely, ensuring a perfect mix of drainage and nutrients. Regardless of where you plant, avoid low-lying spots in the yard where water naturally collects. By prioritizing a sunny, well-draining site, you provide your gladiolus with the essential conditions needed to thrive throughout the growing season. Proper site preparation now prevents common issues like bulb rot and stunted growth later in the summer.

Step-by-Step Planting Guide
Once you have selected a sunny location with well-draining soil, you are ready to begin planting your gladiolus corms. Proper placement is essential for ensuring the health and structural integrity of the plants as they grow.
Follow these steps to plant your corms correctly:
- Prepare the hole: Dig a hole approximately 4 to 6 inches deep. The depth should be adjusted based on the size of the corm; larger corms require the deeper end of this range to provide enough support for the tall flower stalks.
- Position the corm: Place the corm into the hole with the pointed, “eye” end facing upward and the flattened, root side facing downward. If planted upside down, the plant will struggle to reach the surface.
- Space appropriately: If you are planting multiple corms, space them 6 to 8 inches apart. This spacing ensures adequate airflow and prevents the plants from competing for nutrients, which helps reduce the risk of fungal issues.
- Backfill and secure: Gently fill the hole with soil. Use your hands to press down firmly on the surface to remove large air pockets, which can cause the roots to dry out or rot.
- Water: Immediately after planting, water the area thoroughly. This settles the soil around the corm and signals the beginning of the growth cycle.
Because gladiolus plants can reach significant heights, consider their placement in relation to wind exposure. If you are planting in an area prone to gusts, you may want to plant them near a fence or provide a stake at the time of planting to prevent the heavy flower spikes from toppling over later in the season. Avoid over-saturating the soil after the initial watering, as corms are susceptible to rot if they sit in standing water. Once the shoots emerge, maintain consistent moisture throughout the growing season for the best floral display.
Essential Safety and Tool Handling
Before you begin digging into the soil to plant your gladiolus corms, prioritize your physical safety. Preparing garden beds is rewarding work, but it involves repetitive motions and sharp tools that can cause injury if handled improperly. Taking a few moments to prepare your workspace will ensure a smooth, pain-free planting experience.
Always wear high-quality, sturdy gardening gloves. These act as a vital barrier against blisters, hidden sharp rocks, abrasive soil, and potential garden debris. If you have sensitive skin or are working in soil that may contain thorns or glass, opt for gloves with reinforced palms and fingertips for added protection.
Your choice of equipment also plays a major role in preventing strain. When selecting a hand trowel or shovel, perform a quick safety check before you start:
- Inspect the handle: Ensure it is firmly attached to the head and free of cracks or splinters that could snag your skin.
- Check for sharpness: A dull blade forces you to use excessive muscle power to penetrate the earth. Keep your tools sharpened so they slice through soil effortlessly, significantly reducing the risk of repetitive strain injuries in your wrists and shoulders.
- Maintain cleanliness: Wipe tools down after each session to prevent rust and ensure a secure grip during use.
Ergonomics matter just as much as equipment. When digging the holes for your gladiolus—typically 4 to 6 inches deep—avoid overextending your reach. Keep your back straight, bend at the knees, and keep your tools close to your body to maintain better leverage and balance.
Finally, never leave sharp tools lying on the ground where they can become a tripping hazard or a danger to others. As soon as you finish planting, clean your gear and store it in a designated shed or locked container. Keeping sharp edges out of the reach of children and pets is the most important step in maintaining a safe and productive home garden.
Ongoing Care and Common Questions
To enjoy a continuous display of vibrant color throughout the season, practice succession planting. By staggering your plantings every two weeks from early spring until mid-summer, you ensure that new spikes emerge just as the previous ones finish blooming.
Consistent care is the key to healthy, upright gladiolus. Follow these essential maintenance tips to keep your plants thriving:
- Watering: Keep the soil consistently moist, especially during dry spells. Deep watering once a week is more effective than frequent, shallow sprinkling.
- Mulching: Apply a two-inch layer of organic mulch, such as straw or shredded bark, around the base of the plants. This helps retain soil moisture and suppresses competing weeds.
- Staking: Tall varieties may require support. Insert stakes at planting time to avoid damaging the corms later, and secure the stems as they grow.
If you live in a cold climate where the ground freezes, these plants will not survive the winter outdoors. Once the foliage turns yellow after the first light frost, carefully dig up the corms. Gently brush off excess soil, allow them to air-dry in a shaded area for a few days, and store them in a mesh bag or cardboard box in a cool, dark, and dry location until spring.
Are your gladiolus failing to bloom? This is usually a sign of environmental stress rather than disease. First, ensure your planting site receives at least six to eight hours of direct sunlight daily. Gladiolus require high light levels to set flower buds.
Additionally, check your soil fertility. While these plants appreciate a balanced fertilizer, avoid products high in nitrogen. Excess nitrogen encourages lush, leafy foliage at the expense of flower production. If your plants are producing plenty of leaves but no spikes, switch to a low-nitrogen, bloom-boosting fertilizer for the next growing season. With these adjustments, your garden will produce reliable, dramatic color year after year.

Dedicated team of gardening enthusiasts with years of hands-on experience testing lawn mowers, gardening tools, and outdoor equipment. We help home gardeners and professionals alike make informed buying decisions with honest, thorough reviews. From push mowers to pruning shears, we test it all so you don’t have to. Got a gardening tool you’d like us to review? Get in touch!